 Values")
UPDATE: JUN/18/2020
One of the new functions that Tableau 2020.2 offers us is Set Control. This feature allows users to gradually add or remove values from a Set, thereby improving the way the user views and understands their data.
This means that now the user can add values to a Set and explore the data using that Set and then, if required, add or delete values without starting again or without pressing and holding the CTRL key. If you want to know more about this new functionality, I recommend you check out Kevin Flerlage’s post.
As always, It’s wonderful for me to see how the community immediately adopts the new features and this time, it was no exception, because they quickly began to share new designs that take full advantage of the functionality of the Control Set. Needless to say, I am excited both by the designs that I have already seen, and by the new ones that will be published.
But accompanied by that excitement, I can’t forget that our company Tableau Server will not be upgraded to version 2020.2 as quickly as I would like. And so, eager to put some of those designs into practice, I visualized a workaround to achieve in at least some cases, similar functionality using the also wonderful Parameter Actions.
In this post I share the basic technique that allows a user to add/remove values from a dimension with Parameter Actions.

The technique we will use is very similar to the one used in some of my previous blogs, but in this case, instead of storing a hierarchy of dimensions, we seek to save in a single parameter, the information of the selected values of a dimension.
STEP 1. CREATE A PARAMETER.
The first thing we need is to create a parameter. It will keep the values selected by the user and will operate as an imaginary Set.
| PARAMETER | TYPE | ALLOWABLE VALUES | CURRENT VALUE |
| Selected Sub-Categories | String | All | /Accessories//Phones/ |
As default value we will use the values of the Sub-Categories: Accessories and Phones. The “/” character will be used to delimit the start and end of a value.
STEP 2. CREATE A NEW DIMENSION.
The new dimension will have the value of the Sub-Category adding the character “/” at the beginning and at the end of the value.
| Sub-Category_wd | “/” + [Sub-Category] + “/” |
STEP 3. CREATE DIMENSION TO VERIFY THE SELECTED SUB-CATEGORIES.
The intention of this calculation is to make something similar to the information that we would obtain when using a SET, which identifies the elements of a dimension in two groups: The elements selected within the Set (IN/TRUE), or the elements that (OUT/FALSE) have not been selected.
| Is Selected? | CONTAINS([Selected Sub-Categories], [Sub-Category_wd]) |
Since the default value assigned to the parameter, the Accessories and Phones Sub-Categories will have the value of “TRUE” in this calculation. Which means that it’s inside our imaginary Set and the rest of the Sub-Categories will have the value of “FALSE”.
STEP 4. DEFINE A NEW DIMENSION TO UPDATE THE PARAMETER WITH EACH SELECTION OF A MARK.
The definition of the value to update the parameter when a mark is selected will be determined by: 1) The current value of the parameter and 2) If the Sub-Category of the selected mark is inside or outside our imaginary Set.
- For Sub-Categories that have the value “TRUE”: A new click will indicate that the Sub-Category must be removed. How do we do it? Deleting its value within the new definition.
- For Sub-Categories that have the value “FALSE”. A new click will indicate that we must include it. How do we do it? Adding its value within the new definition.
| Add/Remove | IIF([Is Selected?], REPLACE([Selected Sub-Categories], [Sub-Category_wd] , “”), [Selected Sub-Categories] + [Sub-Category_wd]) |
STEP 5. DEFINE A DIMENSION TO OFFER A MENU WITH TWO OPTIONS.
It’s required to include a menu with two possible values: “Add All” and “Remove All”. Since these values don’t exist in our data, one option to create them is to take an existing dimension with at least two values, to define the menu options that I want.
| Menu | IIF([Category] = “Furniture”, “Add All”, “Remove All”) |
With this we add data to our data table that are related only to the user interface and aren’t directly related to our table, although we use a dimension to generate them. This technique is called internal data densification..
STEP 6. DEFINE A DIMENSION TO UPDATE THE PARAMETER IF THE USER SELECTS ONE OF THE ADD OR DELETE ALL OPTIONS
Add/Remove All | IIF([Menu] = “Remove All”, “”, “/Accessories//Appliances//Art//Binders//Bookcases//Chairs/ /Copiers//Envelopes//Fasteners//Furnishings//Labels//Machines/ /Paper//Phones//Storage//Supplies//Tables/”) |
STEP 7. DEFINE TWO NEW DIMENSIONS.
Which will help us disable highlighting of marks, when one of the Sub-categories is selected.
| Highlight | “H” |
| Unhighlight | “U” |
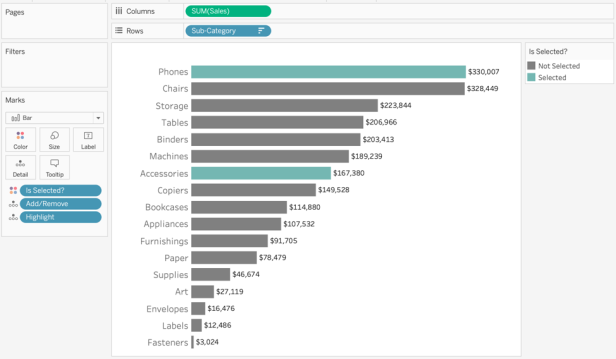
STEP 8. CREATE THE MAIN VIEW.
Move to the shelves of:
- Columns ⬅ SUM(Sales)
- Columns ⬅ Sub-Category ordered descending by sales
- Color ⬅ Is Selected?
- Detail ⬅ Add/Remove All
- Detail ⬅ Highlight
Edit the two values on the color shelf to adjust their colors and also edit their aliases. For the value of “True” change for “Selected” and for the value of “False” change for “Not Selected”.
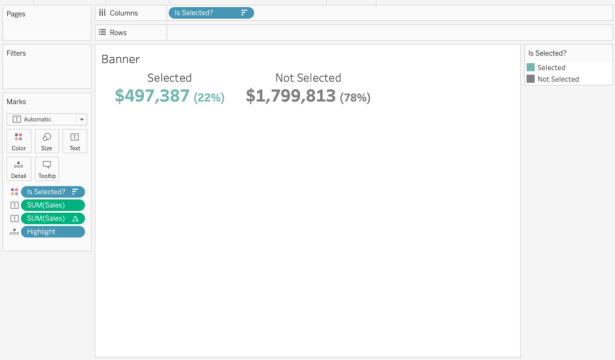
STEP 9. CREATE THE BANNERS VIEW.
Move to the shelves of:
- Columns ⬅ Is Selected?
- Color ⬅ Is Selected?
- Text ⬅ SUM(Sales) (Convert to table calculation of percentage of total)
- Text ⬅ SUM(Sales)
- Detail ⬅ Highlight
STEP 10. CREATE THE MENU VIEW WITH THE ADD / REMOVE ALL OPTIONS
Move to the shelves of:
- Columns ⬅ Menu (hide header)
- Color ⬅ Menu
- Text ⬅ Menu
- Detail ⬅ Highlight
- Detail ⬅ Add/Remove All

STEP 11. BUILD THE DASHBOARD
Include the views created in a Dashboard and format it.
STEP 12. ADD DASHBOARD ACTIONS
We will define two Parameter Actions to update the parameter.
| PARAMETER ACTION | SOURCE SHEETS | TARGET SHEETS | TARGET PARAMETER | FIELD OR VALUE |
| Add/Remove | Orders | Main | Selected Sub-Categories | Add/Remove |
| Add/Remove All | Orders | Menu | Selected Sub-Categories | Add/Remove All |
We will define three filter actions, which to disable highlighting when interacting with the marks of a view.
| FILTER ACTION | SOURCE SHEETS | TARGET SHEETS | CLEAR SELECTION | TARGET FILTERS Selected Fields |
| Unhighlight | Orders | Main | Show all values | Highlight -> Unhighlight |
| Unhighlight2 | Orders | Menu | Show all values | Highlight -> Unhighlight |
| Unhighlight3 | Orders | Banner | Show all values | Highlight -> Unhighlight |
Below is the definition of the action filter for the “Main” view.

Ready!
The interactive version can be found here
A second example, where the menu with the options “Add All” and “Remove All” is replaced and a single option “(All)” is used, you can check it here.

SUMMARY
I love to see how the new functionalities that Tableau benefits us: 1) Simplifying our work and / or 2) Facilitating the implementation of new design ideas and / or 3) Improving the end user experience (UX).
But another thing that I love about Tableau is its flexibility and although I know I have to wait a little longer to already be using Tableau Server 2020.2, I also know that Tableau’s flexibility allows me to find alternative solutions that can help us cover some of the needs that arise during the waiting period.
We know that a parameter by definition supports a single value and that Parameter Actions therefore support only the individual selection of marks. But in this blog, we were able to verify that with a little creativity, we can manage in a single parameter, the multiple values of a dimension selected by the end user.
Therefore, this technique can help us when what is sought is for the user to select or deselect one mark at a time. But if you are looking for multiple selection of marks, the new Set Control functionality will be the most optimal.
I hope you enjoyed reading and let me know if you have any questions.
Thanks for feedback to Keving Flerlage.
Rosario
